Before you start:
If you want to use the Conferencing facility you should have a Jabber account already and you should be online with the Enigma Jabber Client (or any other Jabber Client that supports Conferencing, the Jabber Applet doesnĺt support Conferencing ).
How to get to the Conference facility :
In your (dotLRN) Classes workspace you will find a Link that:
1. Brings you to the Conferencing main page of this Class
2. Let you directly enter this Classes default Conference Room (this facility is not implemented yet).
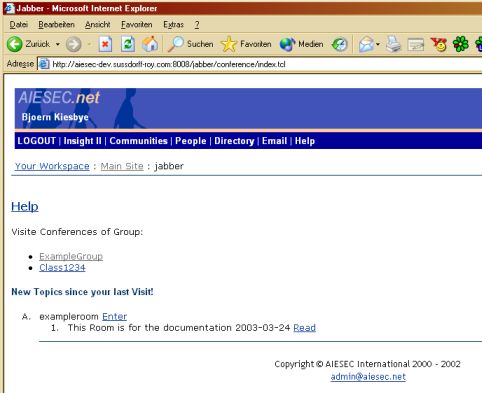
The global main Page (Pic. 1) for conferencing is usually ClassHome/jabber/conference (if you donĺt find it there email your System administrator).
At the global main Page you will see a list displaying all the Conference Groups you are a member of, below you will see a List displaying all new Topics that have been discussed since you last visited this System. Clicking on one of the ĹView LogĹ links behind a new topic brings you directly to the page that shows the whole discussion on this Topic. If you follow one of the Group Name Links ,at the top, you get to the main Page of this Group.
Pic. 1
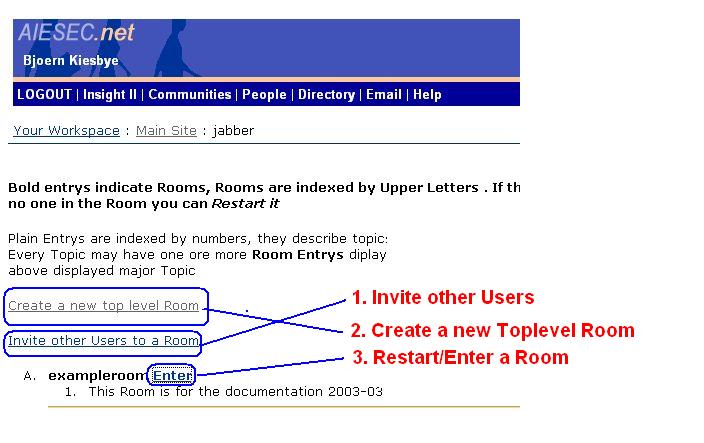
On the Groups main Page (Pic. 2) you find two Links one to Create a new Top level Room , a second to Invite other Users to a Conference Room.
Below them you find a structure displaying all Rooms of this Group with all Topics that have been discussed.
Behind every room you find a Link ,in case other users are currently in this Room , saying Enter. If you are online with Enigma you enter this Room when you Click on the Enter Link. If no one is currently in this Room the Link will be named Restart, clicking this link will restart the Room and you will enter it, again.
Pic. 2
2. Create a new Top level Room.
4. Create a new Sublevel Room.
5. Structure your Rooms and Topics (Example).
1. Invite other Users:
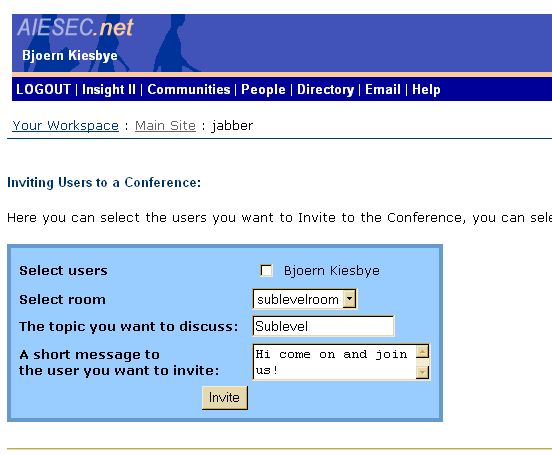
Go to the Invite Page (Pic.2 ) (just follow the Link ĹInvite other Users to a Roomĺ at the top of the page Pic. 2), here you find a List off all users which are currently online and in the same group you are in. . Select the once you want to invite , below you find a Selection Box with all active Rooms including the one you want to Invite your friends to , select it.
Note: You are able to select only those Rooms which are currently open (Re/Started).
In the two Text Fields below enter some words that let the Users you are going to Invite know why you are inviting them and what you want to discuss.
Now you can press the ĹInviteĺ button, every User you selected above will be asked to come to the Room you selected.
At the bottom of the Page you find an extra Section from where you can restart Rooms as well, in case the Room you want to invite users to hasnĺt been opened/restarted yet.
Pic. 3
2.Create a new Top level Room:
To Create a new Top Level Room just click the link on the Groups main Page saying ĹCreate new Top level Room Ĺ. A page will be displayed asking you to enter a new Room Name a description of this Room, as well as the name of the initial Topic and its description. Pressing the create Button will create and start a new Room which will be identified by the Room Name you have entered before.
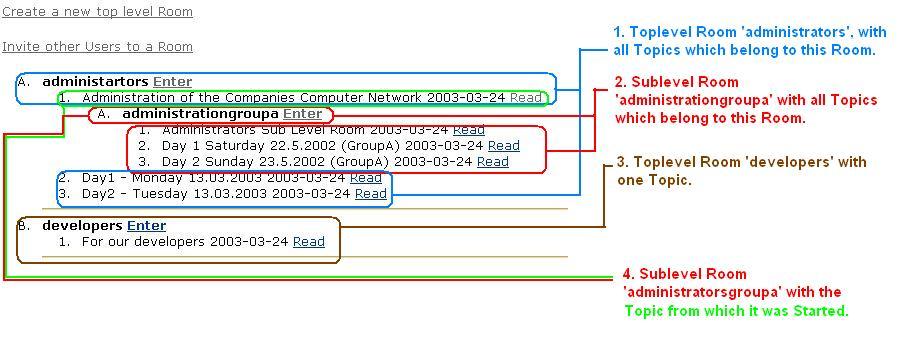
Back at the Groups main Page you find a Link saying ĹCreate new' Top Level Room at the top of the Page, this Link will bring you to a page where you can create an new Room. This way to create a Room is a special one, it will be displayed at the very left of the Room and Topic hierarchy (as you can see it on Pic. 4.1+4.3), you should only use it when there are no Rooms in this Group yet , or if you want to start a completely different Topic to what is usually discussed in this Group
Pic.4
3. View Log
You can view a Log from a previously recorded chat by clicking on the ĹView Log/ReadĹ Link behind a Topic name (Pic. 4). On this Page the discussion in Room (RoomName) about the Topic (TopicName) will be displayed Line by Line (Pic. 5.3). Every Line starts with the nickname of the User who submitted the Text displayed in this Line. If this nickname belongs to a local User you can view itĹs user information (including online and contact information) by clicking on his/her nickname. At the end of every Line the time , when the Text where submitted to the Room , is displayed.
At the Top of every Log Page you have two options, the first is to pick up the Topic (Pic. 5.1). Be careful using the Pickup option, there can be only one Topic at the time, discussed in one Room. Picking up a Topic means that everything submitted to the Room (RoomName) will be appended to this Log Page , until someone changes the Topic again. The system will warn you, in case someone discusses a different Topic in this Room at the moment, before it picks up a Topic.
The second option is to create a sublevel Room (SubRoomName), a sublevel Room has all the features of a top level Room (RoomName) has, the difference is where it is going to be displayed on the Groups main Page. If you create a sublevel Room (SubRoomName ) from a TopicĹs Log Page, the new Room name will be displayed next to this TopicĹs name, just below and a little bit to the left (Pic. 4.4).
Pic. 5
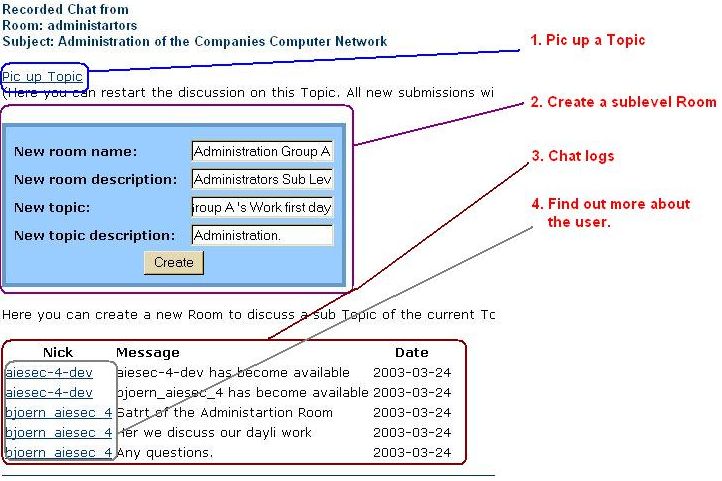
4. Create a sublevel Room
On the View Log Page you find a Form at the top of the page (Pic. 5.2), asking you for the new Rooms name ,this Rooms description , the name of the initial Topic and a description for this topic. When you press the 'Create' button at the bottom of the Form , the new Room (SubRoomName) will be created and youĹll be brought??? to the Invite Page to let you invite other users to the new Room.
If you create a sublevel Room (SubRoomName ) from a TopicĹs Log Page, the new Room name will be displayed next to this TopicĹs name, just below and a little bit to the left (Pic. 4.4).
5. Structure your Rooms and Topics (Example)
There are two types of Rooms (top and sub level) both have the same features, their types differentiate them to let them be created/displayed in a structured way . This makes it easier for you and others, to navigate through and find the information, they are interested in.
Overview:
- Sometimes one Room is just not enough for A. All Users B. All Topics
Case A.: Create a new Top level Room 2 and split the users in room Room 1 into two groups
Case B.: Create a new Top level Room 2 if you have to discuss
a absolute different Topic to what Topics you discuss in Room 1.
Or Create a new sub level Room 2 in case you want to discuss a Topic
that somehow belongs to an existing Topic, but is fare to complex to discuss everything under the existing Topics name
Example:
Back at the Groups main Page you find a Link saying ĹCreate new Top Level Roomĺ at the top of the Page, this Link will bring you to a page where you can create a new Room. This way to create a Room is a special one, it will be displayed at the very left of the Room hierarchy, you should only use it when there are no Rooms in this Group yet , or if you want to start a completely different Topic to what is usually discussed in this Group. Lets say you work for a small company and you are a member of the Group ĹComputer Staffĺ , right now all you have to do is to administrate the existing Computer Network , you will need a Room (named ĹAdministrationĺ) where the members of the Computer Staff can meet to discuss there daily work. This should be a top level Room. Every morning the ĹAdministrationĺ Room is restarted , and every thing about new User accounts, Software updates etc. will be discussed in that Room. May be there are some sub level Rooms created for some bigger Software updates, that need to be discussed in an extra Room but still belong to the major Topic ĹAdministrationĺ.
The company grows and decides to hire Software Developers to standardize the Software company uses with scripts, to serve the needs that grow with the Company. These Software Developers will belong to the Group ĹComputer Staffĺ as well, but you canĺt let them discuss their Topics in the same Room the Administrators use. And logically the Development Topics donĺt fit in a sub level Room , of the top level Room ĹAdministratorsĺ, even if only Developers use this Room it will be hard to find this discussions on development when they are placed somewhere in between administration Topics.
This is the time to create a new top level Room named ĹSoftware_Developmentĺ, this Room can then be used by the Developers to discuss their Topics, and in case the Developers need information from the System Administrators (or vice versa) (the current version of the standard Software, for example) they can enter the ĹAdministrationĺ Room and ask their Questions, or browse older discussions of the ĹAdministrationĺ Room to find the information they need.